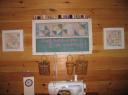
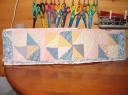
This is a fun way to use an old window and there are many different ways you could go with this project. I needed some way to organize my sewing area a little better so I put hooks on the bottom to hold baskets and put in a chalkboard to use as a shopping list and to make project notes. Most old windows are wide so the top makes a great shelf for thread. I also used a piece of an old quilt to fill in the window but you could use it as a picture frame instead.
Materials:
- old window
- piece of chalkboard or smooth surface wood product that can be painted with chalkboard paint.
- a piece of old quilt the size of one of the window openings.
- glue gun
- cardboard large enough to cover one of the window openings.
- hooks or knobs for the bottom of window.

Step 1.
Look for an old window that is in decent shape. I try to find one that’s missing at least one piece of glass so I don’t have to remove it. It’s easy to do but the old glass can be dangerous to handle so always wear gloves. ( I’ve been careless about this in the past and have some scars to prove it. ) Also remember that most old windows are covered in lead paint so if you decide to strip it, be sure to follow the instructions for handling lead paint which can be found on the internet. I usually just leave them the way they are, or simply paint over it.
Step 2.
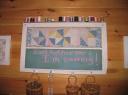
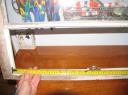
Measure the opening in your window and then cut a piece of chalkboard or corkboard to fit. If you don’t want to buy pre made chalkboard you can use any smooth surface wood or wood product and paint it yourself with chalkboard paint. Chalkboard paint is readily available at any store that sells paint. I use it all the time and will be doing some projects soon to demonstrate some of the ways you can use it. Buy a big can because you’ll get hooked on it!

Step 3.
Apply glue to edge of opening and then set the chalkboard in opening and weight it down with something heavy until it dries.
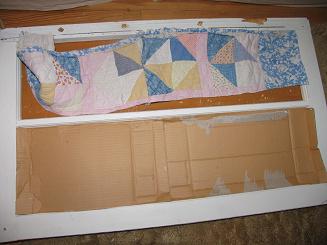
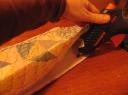
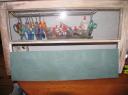
Cut a piece of cardboard to fit in the opening behind the glass. Then cut a piece of quilt to fit over the cardboard. If the quilt is thick it’s best to cut it the same size as the cardboard. If it’s thin you can cut it slightly bigger and hot glue it around the edge of the frame.

Step 5.
Set the cardboard into the opening and hot glue it in around the edges to secure it.

Step 6.
Add hooks or pegs to bottom of frame and you’re finished.
Leave a Reply