 I would like to dedicate this project to my dad who died recently after a long battle with cancer. He was a strong and gentle man who was always there for me and loved me unconditionally. He taught me that good manners, integrity, and hard work are essential to succeed in life. He also taught me the importance of laughter and looking for the good in people. He will live on in the many memories he leaves behind.
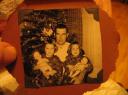
This photo box is made from a cheese carton ! I made this one to look a bit old fashioned because I wanted to display some of my old black and white photos in it. I think this will be fun to display on my coffee table but would also be great on your desk at work.
Materials:
- Cheese carton
- Paint  (one dark color, one lighter color, and crackle glaze paint which can be purchased at any craft store.)
- scrapbook or construction paper
- lace, buttons, paper roses, or anything else you’d like to use.

Step 1.
Peel off the labels from the cheese carton.

Step 2.
Paint the carton with the darker color paint. Let it dry.

Step 3.
Paint over the dried paint with the crackle glaze and let it dry well.

Step 4.
After the glaze is dry paint over it with the lighter color paint. As it dries the paint will begin to crackle and the darker color paint will begin to show through.

Step 5.
Add lettering to the top of carton. I used the decal type that I got in the scrapbook section at Hobby Lobby but stickers or even hand lettering will work just fine.

 Step 6.
Sew buttons onto lace and then glue to the carton top.

Step 7.
Add paper roses and any thing else you’d like to decorate the top with.Â

Step 8.
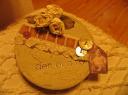
Trace circle from bottom of carton and add tab as shown in picture. Cut out the amount of pages you want from the color of paper you have chosen. Punch two holes in the tabs so that you can tie them all together when you’re finished.

Leave a Reply