


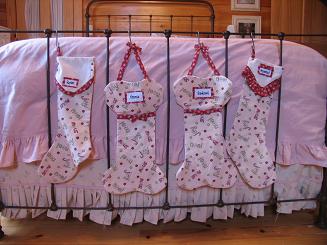
I made these stockings for my son and daughter in law and for their doggie children. They are simple to make and the extra details are quick and easy too.
Materials:
- Each stocking requires about 1/2 yard of fabric
- Contrasting fabric (1/2 yard should be enough to make all four)
- small decorative buttons
- fabric paper for the printer if you want to add names
- 1/4 yard of muslin fabric

Step 1.
Cut out a front and back of the stocking and bone pattern pieces. From the contrast fabric cut (or tear) strips that are four inches wide and some that are two inches wide. These will be used for the ruffle, trim and hangers. Out of the muslin fabric cut out a front and back for each people stocking. For the facing on the doggie stockings you will need to make a pattern piece by tracing the top of your doggie stocking but it only needs to be about four inches long. (See step 3 if this seems confusing.)


Step 2.
Put right sides together and stitch around stocking edges using a 1/2 in seam allowance. Leave all stocking open at the top. On the doggie stocking leave them open at the rounded part too because you will put on a facing piece.


Step 3.
Hem the edge of your facing piece. Now pin it (right sides together) to the top of your doggie stocking. Stitch around the edge and then turn to inside and press.


Step 4.
To make your ruffle fold the four inch strip of your contrast fabric in half, wrong sides together. Using a long basting stitch sew along the edge of strip. Now pull on one of the threads and this will gather the fabric creating the ruffle. Next you will pin the ruffle to the V shaped edge and stitch it into place.


Step 5.
Press the seam up as shown then turn over and topstitch.

Step 6.
For the more masculine stocking you will fold the two inch strip in half and sew along the top. Then sew it onto the edge as shown in steps 4 & 5. I just turned up the edge and ironed it.


Step 7.
To make the name tags print up your names on fabric paper sheet. ( You can do iron on paper instead but be sure to reverse the lettering before printing. ) I used a font that had little snowflakes mixed in but there are lots of fun lettering styles to choose from. Also be sure to leave enough space between each name. Now cut them out in the size you want. Cut a strip of contrast fabric that is slightly bigger than the name tag. Now stitch them on wherever you want.

Step 8.
Attach flap to stocking as shown. Turn and press.


Step 9.
To make bow fold one of your 2 inch fabric strips in half ( right sides together ) and stitch 1/4 inch from edge. Turn to the outside by pulling a safety pin down through the opening and out the other end. Now cut a piece about four inches long and fold it as shown above. Stitch it in the middle. Now take another piece about two inches long and wrap it around the other piece as shown. Hand stitch it.

Step 10.
Make the band by folding the two inch fabric strip in half and stitching along edge. Turn it to the outside with a pin as in previous step. Now slide the bow onto the fabric strip using a pin to pull it through. If your hand stitching prevents you from pulling it through the loop then just attach it by hand sewing it to the band. Hand sew the band to the stocking.


Step 11.
Make the strap the same way as you did the band in the step above and then pin it to the stocking as shown. Stitch into place. I folded the over to make a V at the top and then added bows.


Leave a Reply